
In my family we often use quilts to remember significant events in life. Every child gets a baby quilt and every adult gets a wedding quilt. I’ve made them when I left home to go to college, returned home from a mission, and so many others just for the joy of creating.
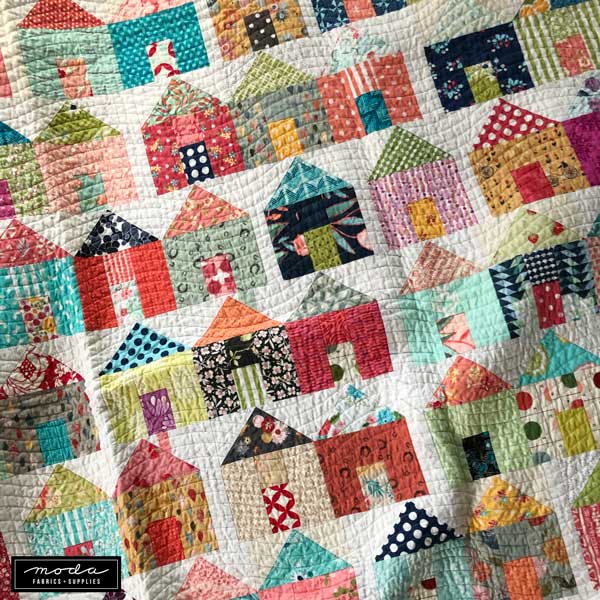
Recently with so much time spent at home with my family I wanted to create a quilt that would remind me of this moment of time. So I began researching. I knew I wanted colorful homes and something that was simple but meaningful. Moda Fabrics released a pattern for a quilt but it wasn’t quite what I had in mind. Then I saw this quilt on Pinterest and knew that I found the direction I wanted to go.


I felt like the rainbow has become a symbol of hope during this time of uncertainty. In my quest to create the perfect quilt, I hoped to include a rainbow pattern. I also didn’t just want it all sunshine and rainbows, that is why you will see some grays and blacks too.
Having taught sewing lessons for many years, I feel like my mind automatically goes to the deconstruction process. I looked at the quilt and knew exactly how I’d make the colorful homes. The picture has reverse homes in the lighter color but I wanted this to be a simple quilt that anyone could do. So I simplified.
I began cutting simple rectangles from my collection of remnants. The rectangles are 4×5 inch squares. My remnants are sorted by colors and so I just went through each color and tried to make equal piles for each color. My piles were definitely not all even but I love the uniqueness and variety that it gave the quilt.

Triangles are one of the trickiest shapes to work with when quilting. I recently made a quilt using a technique that I loved and decided to incorporate with this one. Because I wanted a huge contrast of light and dark colors, I used lighter neutral fabrics for the triangles. I cut tons of 2 1/2 in squares. In fact I had to go back three times to cut more because I didn’t even get close to enough squares. You could pick one neutral color and would create the affect of colored and neutral houses. With each neutral fabric I also cut several 2 3/4 x 4 inch rectangles. You don’t need as many of these as you do the squares but still a lot.

Next I took each 2 1/2 inch square and on the wrong side of the fabric drew a line in pencil from one corner to another. This made it so that my points were exact and that I could proceed without triangles.
Once everything was cut and lines drawn I began putting together the colored houses. I took a set of neutrals, placed one by my machine and the other on the colored rectangle. Then I sewed along the line. I like to sew multiple into a long chain. So continue this until you get several blocks in a row. I usually go until I run out of bobbin.

Next, cut your chain, but keep them in order. Another trick you can do is cut your excess triangle. Again, I like to do several so I cut the rectangle from the chain, trim and stack into a pile. Once my chain is all stacked I iron each rectangle. I didn’t cut the excess on my houses because I just got so excited to create, but I would recommend cutting them to relieve the bulk. Just eyeball about a quarter inch.

Then you take the other pair and sew along the other roof line of the house. Once those are completed you trim and press each house. Repeat until you have as many houses you need to create the quilt of your desire. If your quilt is like mine with a random lighter house for the neutrals, you don’t even have to use the same pattern. In fact I probably wouldn’t if I went back to do it again.

Now comes my favorite part! I love laying out a quilt. To be honest my initial thought was to do it in a rainbow pattern, light to dark. Once I laid it out it didn’t flow like I wanted and so I mixed it up a bit and I love how it turned out. I think that’s the best part of creating- you are free to make it anyway you want and there are no wrong ways to make it.
After I find a pattern I like I collect and number the blocks. I have a house full of little children. If I were to leave a quilt out on the floor it would be destroyed, but if you are fortunate to have a safe place for your quilt you can stack them up as you go. I usually grab a sheet of paper and stack from the left to the right and pin the row number through each stack.

Now you get to sew it together! Nothing is more fulfilling than taking something that has been cut into pieces and putting it back together! I pin the row number to the first square so that I know exactly where I am. Then I stack the blocks next to my machine so that I can just add them as I go. You can line up the top, roofline and bottom to make sure that they are even.
I like to do several rows and then take a break and press each seam. Continue sewing until you have sewn each row. I got so excited to see what it would look like that I started sewing rows together before I was finished sewing all of my houses into rows. Whenever you start, make sure you pin the sides of the house and the smaller 2 3/4 inch by 4 inch rectangles. If you pin, your seams are 99% more likely to line up!

Continue sewing each row together and press. When you have the quilt top done you are ready to create the back and put it all together. There are many ways to finish a quilt. Depending on the size, I love machine quilting them myself, if they are a reasonable size and simple pattern.
I can’t wait to see what will happen with mine. I have an idea of creating the back with a black fabric and then piecing a colorful house out of my extra rectangles on the back. We’ll see how it goes.

I really wasn’t expecting anyone but myself to appreciate the quilt so I didn’t document through pictures as I went. I took a few after pictures and tried to cover the little details that would make creating one yourself a breeze. So for those of you who were interested in the pattern. Here it is!
Cut out:
*4×5 inch rectangles of colorful fabrics
*2 1/2 inch squares of light neutral fabrics
*2 3/4 x 4 inch rectangles of light neutral fabrics

